EC / Salinity device: automatic measurement, setup and calibration
Reading time: ~10 minutes · Execution time: ~30 minutes (hardware excluded) + 5 minutes of calibration · Audience: anyone who wants their tank's salinity measured continuously on the portal, without a refractometer at hand
🔵 Advanced guide — not part of the 01-08 onboarding path. Tackle it only if you have already set up your tank and sensors (guide 04).
1. What you are about to do
In JoyReef, salinity is measured with a dedicated device: a small standalone board (type ec, name ec-XXXXXX) with its own ESP board, its own ADS1115 module and a conductivity (EC) probe designed for marine water. It's the twin of the pH device (guide 18): you flash it, connect it to WiFi, it appears on the portal as "EC / Salinity probe", you assign it to a tank — and from that moment salinity is a live tank metric, with historical chart and dashboard widget.
How it works: the probe measures the water's electrical conductivity (EC, in mS/cm), which in marine water is directly related to salinity. The firmware compensates for temperature and converts the value to ppt (parts per thousand): the classic 35 ppt of ocean water. Everything on board: the portal receives the value ready to use.
In this guide:
- You'll assemble the EC device (board + ADS1115 + probe board)
- You'll flash it and connect it to WiFi
- You'll complete the configuration wizard (basics + calibration)
- You'll use the Salinity page and the dashboard widget
⚠️ The EC device and the pH device must never share a power supply. The EC probe injects a small electrical signal into the tank: if the EC device and the pH device share power or ground (same powered USB hub, same multi-port power supply), the pH reading gets disturbed. Use two separate USB power supplies, each in its own outlet. This is why EC and pH are two separate devices and not a single board. It also helps to keep the two probes apart (about 20 cm, not side by side), since the disturbance falls off quickly with distance. See guide 18.
2. What you need (hardware)
- ✅ An ESP8266 board: a Wemos D1 mini (~€3-5) works perfectly. (Only the ESP8266 is supported at the moment.)
- ✅ An ADS1115 module — the ADC that reads the probe's analog signal. Connects with 2 wires (I2C).
- ✅ A DFRobot Gravity DFR0300-H EC board with K=10 probe — the seawater version (10-100 mS/cm range). Not the K=1 freshwater version: it would go out of range in a marine tank.
- ✅ The synthetic salt you use for water changes and a calibrated refractometer: you'll use them to make your own calibration sample (see sec. 5). The 12.88 mS/cm standard solution often found in the probe's box is not needed — in fact it's what throws the reading off
- ✅ RO water to rinse the probe
- ✅ A dedicated USB power supply (see warning above)
💡 "Clean" build: if you want to mount everything in a 3D-printed box with a perfboard (like the original JoyReef devices), the perfboard and wiring diagrams are in the project repo. To get started, though, the modules and a few dupont wires are enough.
3. Assembly
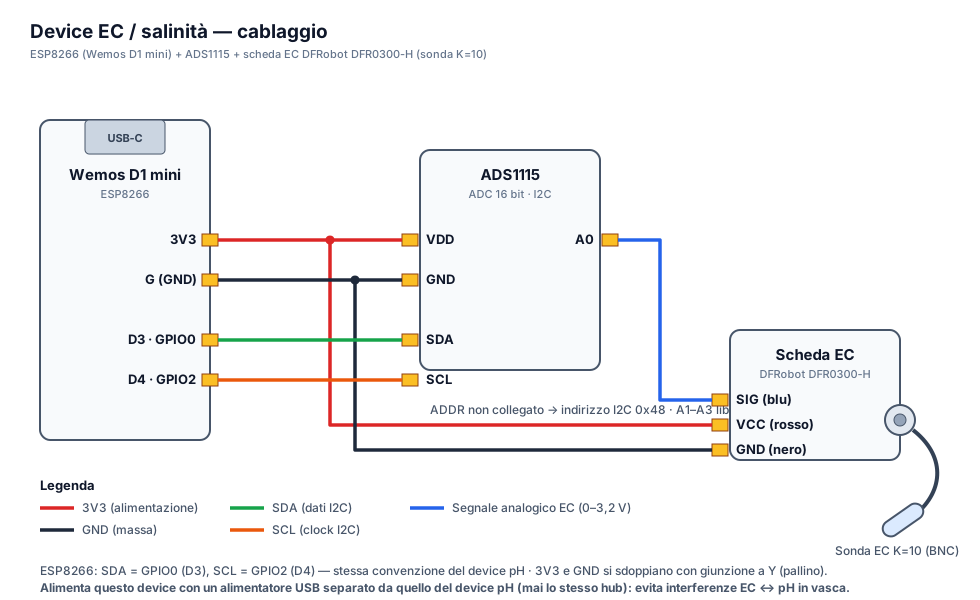
The chain is: EC probe → DFR0300-H board → ADS1115 → ESP board. The DFR0300-H board has its own 3-wire cable (Gravity connector): signal, power and ground.
EC board → ADS1115 / board
| Gravity wire (DFR0300-H) | Goes to | Notes |
|---|---|---|
| Blue (signal) | A0 of the ADS1115 |
0-3.2 V analog signal |
| Red (VCC) | 3V3 of the board |
everything at 3.3 V |
| Black (GND) | GND of the board |
ADS1115 → ESP board (I2C, 2 wires)
| ADS1115 | ESP board | Notes |
|---|---|---|
VDD |
3V3 |
power |
GND |
GND |
ground |
SDA |
board's SDA pin | I2C data |
SCL |
board's SCL pin | I2C clock |
The I2C pins are the same as the pH device: SDA = GPIO0 (D3), SCL = GPIO2 (D4).
🔘 Factory reset button (optional). It goes on
D0(GPIO16), wired to3V3— not on GPIO2, which here is the ADS1115's I2C clock. Held for 8 seconds it erases WiFi and configuration.
💡 The EC probe is sturdy (it's a cylinder with two electrodes, no delicate membranes like pH), but the board connector isn't: secure the DFR0300-H board well in the box and leave some slack on the probe cable.
4. Firmware flash + WiFi
The EC device is flashed and connected to WiFi exactly like the other JoyReef devices:
- Firmware flash: follow guide 16 choosing the EC probe firmware. (For later updates: OTA from the portal, guide 17.)
- WiFi connection: on first boot the device creates the
joyreef-XXXXXXconfiguration network (captive portal). Same procedure as the controller, described in guide 03b.
After a few seconds the device appears on the portal in Config → Devices with the type "EC / Salinity probe" and the name ec-XXXXXX.
5. Configuration wizard (basics + calibration)
Open the newly appeared device in Config → Devices and click "Start configuration": a 2-step wizard begins.
Step 1 — Basics
Give the device a meaningful name (e.g. "Tank salinity") and assign it to a tank. Assign it to the same tank as the controller measuring the temperature: it's needed for automatic compensation.
💡 Automatic temperature compensation (ATC). Conductivity depends heavily on temperature (~1.85% per °C). The EC device receives the tank temperature automatically from the portal and normalises the reading to 25 °C — you don't have to wire any temperature probe. If no temperature arrives for more than ~10 minutes, the device falls back to 25 °C until the data returns.
Step 2 — Calibration
The K=10 probe leaves the factory with a generic factor and must be calibrated. Do not use the 12.88 mS/cm standard solution, not even the one in the box: make a 35 ppt seawater sample and calibrate with that.
⚠️ Why not the 12.88. Standard conductivity solutions are not seawater: they have a different composition, meant for laboratory calibration, and the probe behaves differently in them than it does in salt water. Calibrating on one liquid and measuring another is like setting a scale with a reference weight and then weighing something made of a different material. On top of that, 12.88 sits four times below the point you actually measure at (tank water is around 53 mS/cm), so any calibration error reaches you amplified. Reference solutions formulated for seawater do exist (Aquaforest AF Reference Solution, for one), but there's no need to buy them: the sample you make at home is the better reference, because it is exactly the water you want to measure, made with your own salt.
Make the sample — once, then reuse it:
- Fill a clean bottle with RO water
- Dissolve the synthetic salt you use for water changes until you reach 35 ppt measured with your calibrated refractometer
- Let it dissolve fully and wait until the liquid is at room temperature
Calibrate — from the wizard, or later from the Salinity page:
- Rinse the probe in RO water and pat it dry
- Immerse it in the 35 ppt sample and wait 1-2 minutes for it to stabilise
- Enter the solution conductivity: 53.0 mS/cm, the value matching 35 ppt at 25 °C. Replace the pre-filled 12.88
- Enter the solution temperature (required field — measure the liquid in the bottle, not the tank: a 4-5 °C difference means an 8-9% error)
- Press "Calibrate now": the factor is saved on the device
🖼️ Image to insert here (EC calibration wizard): screenshot of wizard step 2 with the "Solution conductivity (mS/cm)" and "Solution temperature (°C)" fields and the "Calibrate now" button.
When the wizard finishes, the portal takes you straight to the Salinity page.
💡 You can skip calibration and do it later (it's also on the Salinity page): the device still measures with the default factor, but absolute accuracy is not guaranteed. The "Restore factory calibration" button undoes a bad calibration at any time.
⚠️ Recalibrate every 2-3 months, or whenever the value doesn't match your refractometer: electrodes get dirty (films, limescale) and the factor drifts. Clean the probe with RO water before recalibrating, and make a fresh 35 ppt sample as above.
6. The Salinity page
You'll find it under Monitoring → Salinity (URL portal.joy-reef.com/sensors/salinity), or via the "Details →" link on the dashboard widget. It shows:
- The current salinity in ppt, with Live/Offline badge and status (OK / Warning / Alarm)
- The graduated scale 28-42 ppt with the 34-36 ppt target zone highlighted and the needle in real time
- The EC Calibration section (the same as the wizard, for periodic recalibrations)
- If you have multiple EC devices on the same tank, the per-device table with each one's value and status
🖼️ Image to insert here (Salinity page): screenshot of the Monitoring → Salinity page with the current value in ppt, Live badge, 28-42 scale with the 34-36 target zone highlighted and the EC Calibration section.
On the dashboard, salinity has its own widget: current value, last-24-hours chart and 24h average.
💡 The journal benefits too: when you create a journal entry, the salinity field comes pre-filled with the EC device's reading ("Automatic detection") — no more manual transcriptions from the refractometer.
7. If something goes wrong
| Symptom | Probable cause | What to do |
|---|---|---|
| Salinity missing / "No EC device assigned" | Device not assigned to the tank | Config → Devices → open the device → Tank field |
| EC device offline | WiFi/MQTT down | Check power and WiFi (repeat the captive portal of guide 03b if you changed network) |
| ADS1115 not detected | Wrong I2C pins or wiring | Verify SDA/SCL (GPIO0/GPIO2) and VDD/GND |
| Obviously wrong readings (e.g. 20 or 50 ppt with a healthy tank) | Calibrated with the 12.88 standard solution, or solution temperature not entered | Recalibrate with the 35 ppt sample (sec. 5), entering 53.0 mS/cm and the liquid's temperature; in extreme cases "Restore factory calibration" and recalibrate |
| "Jumpy" readings | Air bubbles on the electrodes or probe near pumps | Gently shake the probe to free the bubbles; move it to an area with moderate flow |
| The value doesn't match the refractometer | Probe drift or uncalibrated refractometer | Calibrate the refractometer with its solution, then recalibrate the EC device |
| Salinity "frozen" while temperature changes | No temperature arriving → ATC on 25 °C fallback | Assign the EC device to the same tank as the controller with the temperature probe |
| pH went crazy since the EC device arrived | Shared EC/pH power supply | Two separate USB power supplies, never the same powered hub (sec. 1) |
JoyReef guide · v1.0 · Questions? Write to supporto@joy-reef.com